Floppy Drives (FDD)
Diskette Densities:
Diskette Types
|
Types |
Storage |
Tracks |
Sectors |
Cluster |
|
5-1/4" Double Density |
360 kB |
40 |
9 |
2 sectors |
|
5-1/4" High Density |
1.2 MB |
80 |
15 |
1 sectors |
|
3-1/2" Double Density |
720 kB |
80 |
9 |
2sectors |
|
3-1/2" Double Density |
1.44 MB |
80 | 18 | 1 sectors |
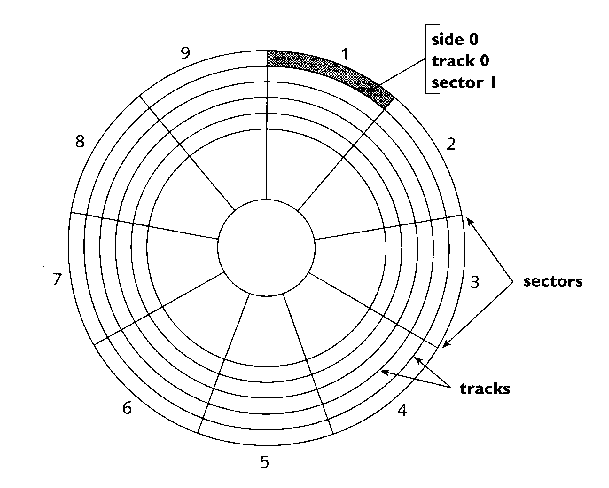
Diskette Data Storage
Tracks: Concentric Circles laid on the diskette during the formatting process. All tracks hold the same amount of data.
Sectors: Pie shaped wedges separating the tracks. Although a sector can mean the whole pie shaped wedge covering many tracks on the diskette we will refer to a sector as being a segment of one track as defined by one pie shaped wedge. Sectors are also written during the formatting process. A sector (segment of track) on a floppy diskette always holds 512 bytes of data (for all densities).
How Data is Written: Data is written as a rectangular magnetised bit to the track as a '1' or a '0' depending on the magnetisation orientation (polarisation). There are non-magnetised spaces between bits and tracks. Two read and write heads are located on and move along an actuator arm in the floppy drive (one set is above the diskette and one set is below). The diskette speed is approx. 200-300 rpm. Data is written first to the bottom of the diskette and then to the top - starting from the outer perimeter of the diskette. Eraser heads immediately behind and to the sides of the write head clean up both sides of the magnetised spot, preventing "bleeding from the track.
PRACTICAL - Using Norton's Disk Editor to view, edit and recover files (floppyprac1 - 2).
THEORY: - Diskette Data Storage
Tracks: Concentric circles. All tracks can hold the same amount of data.
Sectors: Two Meanings - 1) Pie shaped wedges that divide many tracks.
2) A segment of one track as defined by one pie shaped wedge. A sector on a floppy disk always holds 512 bytes of data (for all densities).
Clusters: One or more sectors that make up the smallest unit of space on a disk used to hold a file. Files are written to the disk as groups of whole clus-ters. Also known as a file allocation unit.
Master Boot Record (MBR): (HDD Location: Head 0, Cylinder 0, Sector 1). The information in the 1st sector of any hard disk or diskette that identifies how and where an operating system is located so that it can be booted (loaded) into the computer's main storage or RAM. The Master Boot Record is also sometimes called the "partition sector" or the "master partition table" because it includes a table that locates each partition that the hard disk has been formatted into. In addition to this table, the MBR also includes a program that reads the boot sector of the partition containing the operating system to be booted into RAM. In turn, that record contains a program that loads the rest of the operating system into RAM.
DOS Boot Record (DBR): (HDD Location: Cylinder 0, Head 1, Sector 1), (Diskette Location: Cylinder 0, Head 0, Sector 1). Contains the program that loads the operating system. For instance: The DBR contains the location of the program (IO.SYS) that loads the DOS operating system.
How data is written: Data is written as a rectangular magnetised bit to the track as a '1' or a '0'. Whether the data is a '1' or a '0' depends on the magnetisation orientation. There are non-magnetised spaces between bits and tracks. Two actuator arms located above and below the diskette each house a single read/write head. The diskette speed is approximately 300 rpm. This limits the controller transfer to 500 KB/s. The DOS boot record is found at head 1, sector 1, on the underside of the diskette. Data is written first to the bottom of the diskette and then to the top, starting from the outer perimeter of the diskette. Eraser heads immediately behind and to the sides of the write head clean up both sides of the magnetised spot, preventing "bleeding from the track.
The Formatting Process: All diskettes follow the same process: ¨ The tracks and sectors are created by writing tracks as a series of F6,s. The sector address marks are also written to identify the beginning sector on a track. ¨ The DBR is created. ¨ The file allocation table (FAT) is created (2 copies). ¨ The root directory is created. Adding parameters to the FORMAT command line can alter the above formatting process.
The File Allocation Table (FAT): During the formatting process 2 copies of the FAT are written to the diskette. The second copy of the FAT immediately follows the first. The 2nd copy can sometimes be recovered to repair a damaged 1st copy of the FAT.
The FAT contains the location of files on the diskette. The length of each FAT entry is 12 bits. The FAT is simply a one-column table that provides information on how each cluster or file allocation unit on the diskette is being used. A cluster is the smallest unit of space that can be addressed on the diskette by the FAT and may be more than one sector in size (e.g. 1 cluster = 2 sectors for a 720 kilobyte double density diskette).
Files are said to be contiguous on a disk when the FAT entries for that file are consecutively numbered (e.g. 008, 009, 00A, 00B ….etc.). However, this is not always the case. If a file is not contiguous it is considered to be fragmented. The FAT may also contain bad cluster references that are marked with the 12-bit entry as FF7H.
The beginning cluster of a file is stored in the root directory of the diskette. Below is an example of a FAT with a fragmented file that is 4 clusters in length (i.e. This file is 1,798 bytes in length). In this example the root directory entry for the beginning of the file is cluster number 004. This cluster (004) points to the next cluster containing the file (005). Cluster 005 points to the next cluster location for the file (1C2 - Hex or 450 - decimal). Cluster 1C2 (450) points to the location of the last cluster in the file (1C3 - Hex or 451 - decimal). Note that the last cluster (451 or 1C2) is the End-Of-File cluster. The End-Of-File cluster is always marked with FFF. These four FAT entries are called a cluster chain.
CLUSTER No (decimal equiv.) File Allocation Table (FAT) 2 3 4 005 5 1C2 6 7
449 450 1C3 451 FFF 452
The root directory only contains the starting cluster number. The FAT contains information regarding the other clusters contained in the file. Finding the number of clusters per file: To find the number of clusters taken for a given file: Find the size of the file in bytes and then divide it by the number of bytes per cluster. Remember to count any part cluster as a whole cluster when rounding up.
Exercise: A file's size is 2,368 bytes. How many clusters are allocated to this file on a 3.5-inch double density diskette? Note: 2 sectors per cluster on a 3.5-inch double density diskette.
The Root Directory: The next entry created by the formatting process is the root directory. The root directory is a table that lists all the files in this directory. A root directory entry may also be a directory containing subdirectories and files (these only have disk size limits).
However, the root directory is restricted to a certain amount of entries, depending upon the type of diskette used. For example: A 3.5 - inch (720 kB) diskette can have a maximum of 112 root directory entries while a 3.5 - inch (1.44 MB) diskette can have a maximum of 224 root directory entries.
The root directory will contain information regarding each file and subdirectory stored in it. Below is a table listing the 32 bytes that make up each entry in the root directory and how they are used: Root Directory Information for each File
Bytes Description 8 Name of file 3 File Extension 1 Attribute byte (Each bit has a meaning) 2 Time of creation or last update 2 Date of creation or last update 2 Starting cluster number in binary 4 Size of file in binary
Note: The period between the filename and file extension is not part of the root directory information as this is implemented by DOS command lines. The Time and Date entries are coded but are converted to recognisable form when displayed on the screen. The system determines these parameters. The earliest possible date allowed is 1/1/1980.
File Attribute Byte: The one byte allocated to File attributes is broken into bits. Each particular bit in this byte has a specific meaning. The chart below indicates the meaning of each bit in the attribute byte. Meaning for each bit in the Root Directory attribute byte
Bit Description Bit = 0 Bit = 1 8 Not used 7 Not used 6 Archive bit Not to be archived To be archived 5 Directory status File Subdirectory 4 Volume label Not volume label Is volume label 3 System file Not system file Is system file 2 Hidden file Not hidden Hidden 1 Read-only file Read/write Read only EA-194 PC Systems Support
Practical Part 1 - EXAMING DATA WITHIN A FLOPPY DISK
In this exercise you will be using Norton's Disk Edit program to examine both the DOS boot record and the FAT (File Allocation Table) of your own boot disk. Firstly you will be required to load a test file (e.g.Carew.txt) to your disk. The ".txt" file extension identifies this as a text, or ASCII, file.
Procedure:
1. Ensure you have a copy of the test file, Carew.txt, on your floppy disk. Borrow the teacher's disk and copy it via the C:\ drive.
2. Run Norton's disk editing utility (de.exe) and log onto the A: drive (Alt O, D)
3. View the boot record information (Alt O,B) to ensure it agrees with the data within your notes. Note: you should be viewing the data as a boot record (Check Alt V, B).
4. Now check the root directory structure (Alt O,R …)and determine both the size and starting cluster for Carew.txt.
Size = ______ bytes
Starting cluster = _______
File should occupy _______ clusters (sectors).
5. Go to the FAT (Alt O,1) and find the location of the second cluster of that file (this is stored in the FAT entry for the starting cluster).
6. Show the linking of the clusters of this file by filling in the extract of the FAT below:
Start Cluster
2nd cluster
3rd cluster
4th cluster
5th cluster
next Cluster No. Contents (next cluster)
Practical Part 2: Simple File Recovery (Using Norton's Disk Editor)
Aim: To delete a known file located on a floppy disk and recover it using Norton's Disk Editor.
Method:
Step1. Using your bootdisk from the previous practical (floppyprac) boot your computer using the A: drive.
Step2. Start Norton's Disk Editor (de.exe) located on your floppy disk and view the FAT contents relating to 'carew.txt. Record all the details concerning the file's clusters (and pointers) in the results table below.
Step3. Remove your floppy disk and ensure that it is not write protected. Replace the diskette in the A: drive.
Step4. From the A: prompt delete the file named carew.txt.
Step5. Start Norton's disk editor again and from the 'TOOLS' menu ensure that the 'read only' attributes box is not ticked. Now you can make changes to the A: drive's contents.
Step6. View the A: drives contents from the 'OBJECTS' menu and when you find 'arew.txt' change it to 'carew.txt'.
Step7. Now view the FAT contents and change the clusters relating to 'carew.txt' back to how they were originally recorded.
Step8. Go back to the A: prompt and ensure that 'carew.txt' is visible as a file on your diskette again. If so, you have successfully recovered a deleted file!
Questions:
Qu 1. Was your file (e.g. carew.txt) contiguous?
_____________________________________________________________________
Qu 2. If you wanted to recover a text file that and did not have prior knowledge of the FAT details relating to that file - what steps would you take to recover the file?
_____________________________________________________________________
_____________________________________________________________________
_____________________________________________________________________