Important Note: Some Laplink serial (and perhaps other brands) do not connect the handshaking signals from end to end, even though they operate correctly with these third party software packages DCC may not connect, or if they connect they may not operate properly.
Both computers must have an unused port availiable. DCC may operate using two printer ports, or two serial, a mixture of serial and parallel will not work and may cause damage to the printer port in extreme cases. Printer (parallel) ports have 25 holes in a D shaped connector (female type port on the back of the computer). Serial ports may have either 25 or 9 pins visible and are most often male type (also D-shaped on the back of the computer). Parallel ports are labeled LPT1, LPT2 etc and may have a small icon of a printer. Serial ports are designated COM1, COM2 etc, refer to any documentation you may have for your computer.
Note: Both ports must be the same type (serial or parallel)
Also availiable: Windows 95 to Windows 3.1 or DOS Instructions (Interlink)
Each of the settings in this document are critical in getting direct cable connect to operate. You may encounter other problems with your computer hardware such as the ports not being correctly configured, defective cable or other installed programs causing trouble. Consider trying one of the commercial alternatives in the event you just can't get it going. Only consider tech support options that charge a one time - per incedent solved fee, as contrasted to a time based fee that could cost far more than what the feature is worth before the problem is solved.
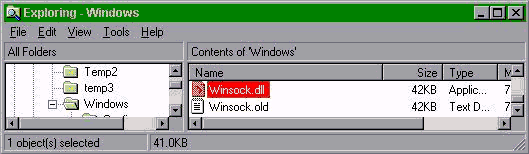
If you do not use "Dial-Up Networking" to connect to the internet, the winsock/dialer you are using could be disabled by installing Direct Cable Connection. For computers with no internet access and no network software or if you are already using the built-in winsock shown below, continue on to the setup/install procedure.
If you did not set-up the internet on the computer, not a problem, but if the above pictures are not familiar to you, consider consulting your service provider before performing this procedure. You might consider using interlink to connect your computers. If you are a bit more daring or familiar with the winsock you are using, be aware the following file will be overwritten if you install "DCC" which requires "Dial-Up Networking":
You will want to review the following Microsoft KB article #139384 for more assistance in installing third party winsocks. Perhaps the instructions for the particular dialup you are using will be of assistance as well. If you can configure the winsock to use a winsock.dll in its own directory, and can redirect clients to load it, the task is complete.
Common Set-Up for Both Computers
Hint: You are about to perform the changes required to enable the direct connect feature in Windows 95. This requires some changes and/or installation of network drivers to the operating system. You should exit all applications on the computer being configured, and if windows prompts to RESTART the computer ... please do it. Windows performs some of the installation procedure following a restart, and combinations of more than one post update can cause trouble.
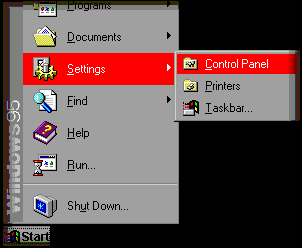
Click START / Settings / Control Panel
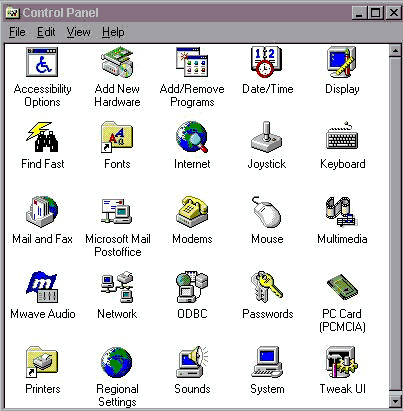
Click Add/Remove Programs and verify you have Direct Cable Connection Installed.
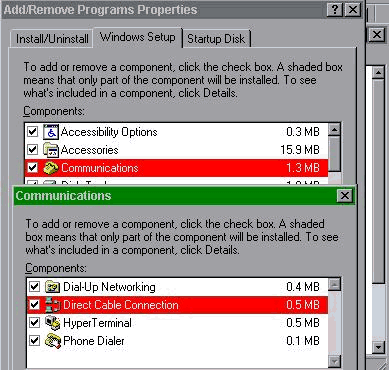
If the check mark is not apparent next to "Direct Cable Connection," click in the box then select OK. Windows will install the direct cable client when you click OK at the main Add/Remove Programs Properties window.
Warning: If the check box next to "Dial-Up Networking" is not checked, windows will require its installation. Please read the warning at the beginning of this page regarding possible disabling of your internet dial-up connection.
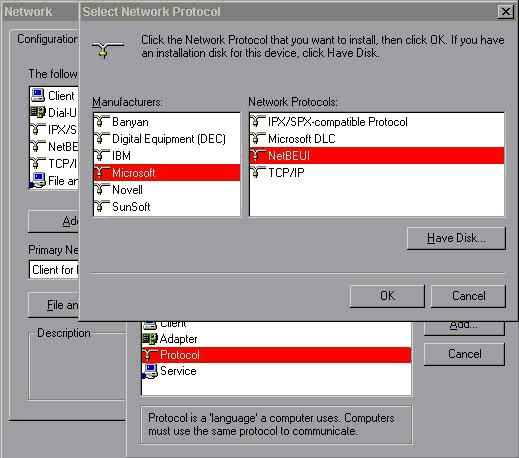
You now must select a protocol to be present on both computers. NetBEUI alone is fine, however when connecting to a computer on a LAN using the NetBEUI protocol Microsoft recommends the IPX/SPX-compatible protocol also be present (see KB article #127136)
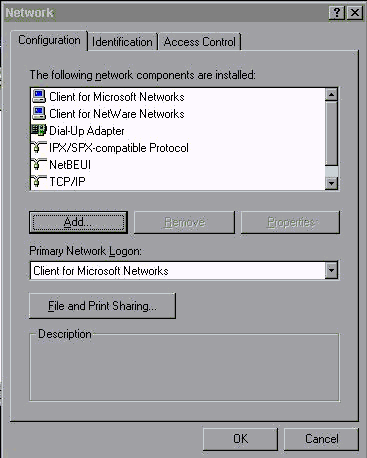
In the Control Panel, click on Network:
You may already have some of the network drivers installed. You will need to have "Client for Microsoft Networks," "File and Printer Sharing for Microsoft Networks" and at least one protocol other than TCP/IP (NetBEUI or IPX/SPX). Click on the "Configuration" tab to examine your network components.
To add a protocol, either NetBUI and/or IPX/SPX-compatible, click ADD, Select Protocol and click Add, Select Microsoft and add the drivers of your choice.
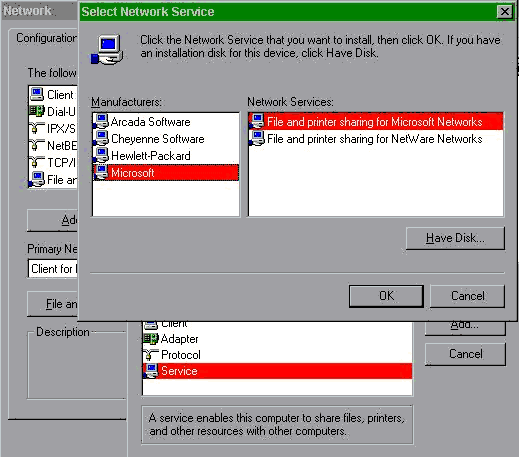
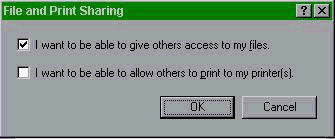
Add the service called "File and Printer Sharing for Microsoft Networks." Click ADD, select SERVICE, click ADD, select Microsoft and add "File and Printer Sharing for Microsoft Networks." Windows will also install Client for Microsoft Networks:
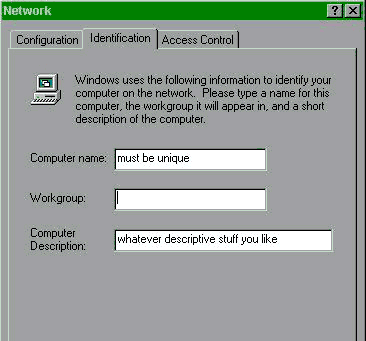
Now assign the name of your windows 95 computer; this appears in the first box entitled "Computer Name." You will need this name later in the DCC connect procedure. If one of the computers is connected to a Microsoft networking LAN, enter your "Workgroup" name (this can be found by examining this panel on the LAN connected computer).
Important Note: Both computers must have a different "Computer Name."
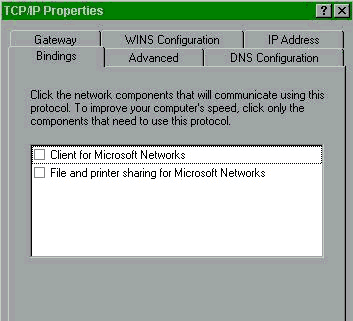
Configure the bindings for TCP/IP so no-one can access or damage your files while logged into the internet.
We are Done With the Control Panel.
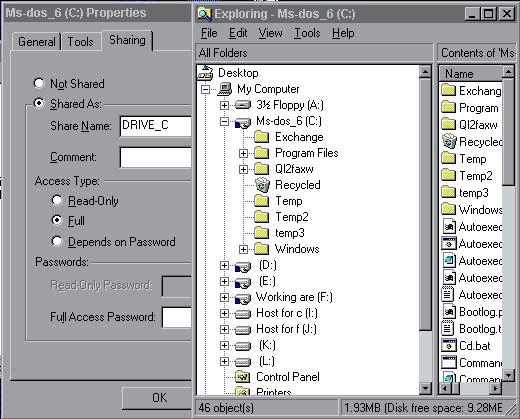
Run "Windows Explorer" and share some information so that we can
test our new link.
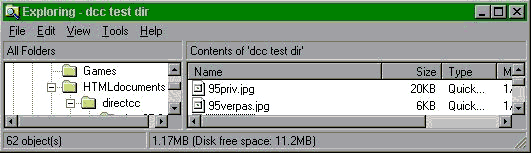
This is done by highlighting the drive, clicking file and properties. Give an appropriate share name as this will assist you when using the files from a remote computer. Example: share name for drive c: in this example is DRIVE_C.
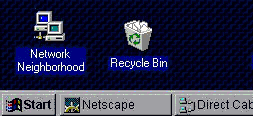
If you have removed the "Network Neighborhood" ICON from your desktop
(shown below) replace it now. Removal of the ICON disables
some of the networking drivers required to access files in windows
explorer. It is not important where on the desktop the ICON appears.
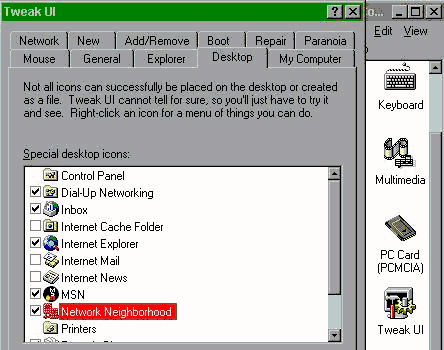
To replace the ICON you need to have a program called "Tweak UI (user interface)." This is one of the tools provided by Microsoft and you may download a copy of it by clicking below. You need only do this if you cannot find the Network Neighborhood ICON on your desktop.
RESTART YOUR COMPUTER if you chose not to during the setup of your computer.
Make Sure You Have Performed Setup Procedure on BOTH Computers
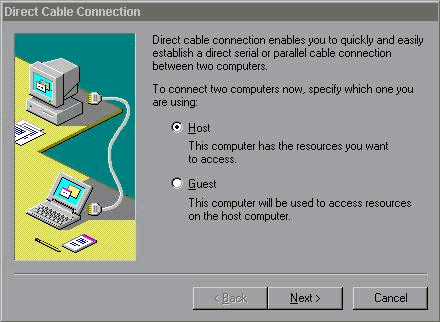
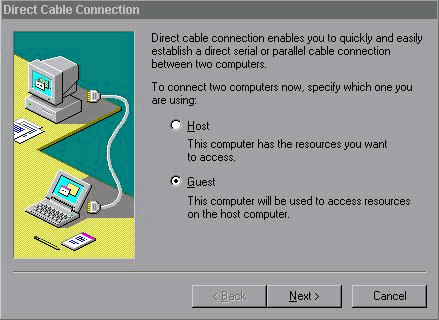
Select Host and Guest Computer
Note: Provided both connections are serial, or both parallel it does not matter if one is com1 and the other com4 etc.
DO THIS PROCEDURE ON THE HOST
On the HOST computer, click Acessories/System Tools/System Policy
Editor:
This program comes on the Windows 95 CD or is availiable for
free
download.
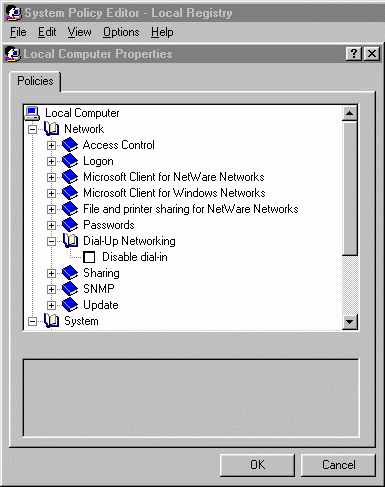
Verify dial-in has not been disabled on the Host if you are connected to a LAN or experience trouble connecting with DCC. This setting, if disabled, has been reported to prevent connection on later versions of Windows 95. Instalation notes, and Microsoft article on policy.exe.
Launch the "Direct Cable Connect" utility in windows 95 (It is probably in the "Accessories" menu.)
Click Change
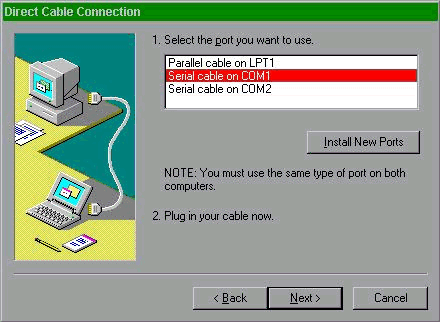
If the port you are using does not appear, click the "Install New Ports" button and follow the directions. In the event this fails you have not correctly installed the port into Windows 95. It should appear in the System display for Control Panel.
DO THIS PROCEDURE ON THE GUEST
Launch the "Direct Cable Connect" utility on the Guest:
Click Change
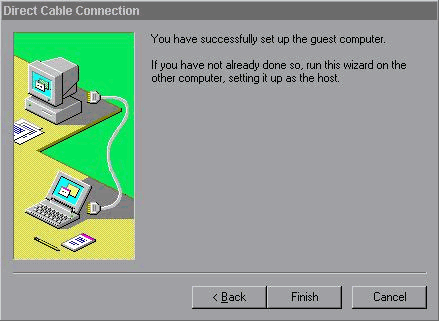
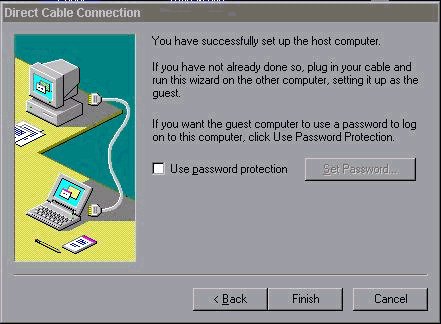
Click Finish
Using Direct Cable Connect
Direct cable connect should now be configured for operation on your computers. It is not required to setup the HOST/GUEST settings again unless the location of the cable is changed. Clicking LISTEN/CONNECT bypasses the setup procedure using the last known configuration.
Note: It is not wise to disconnect the cable during file transfers. You should click CLOSE on the Direct Cable Connection box before unplugging or shutting down one of the computers.
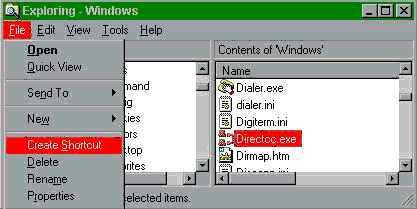
If you intend to use DCC often, create a shortcut and drag it onto your desktop for convenience.
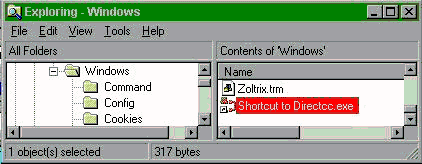

You may create a shortcut on the desktop or access the feature by clicking START - Programs - Accessories - Direct Cable Connection.
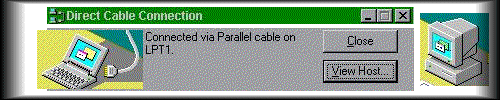
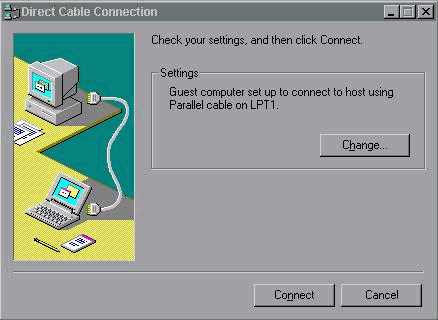
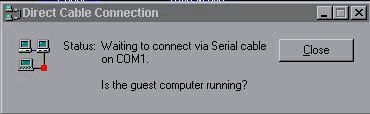
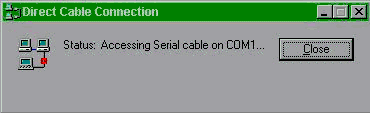
(HOST Computer Display)
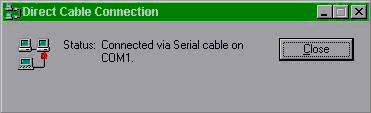
Start DCC on the HOST computer first by clicking LISTEN. When the HOST is ready, the image above should appear. Now start DCC on the guest by clicking CONNECT.
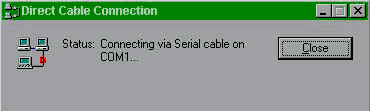
 (GUEST Computer Display)
 (GUEST
Computer Display)
(GUEST
Computer Display)
 (GUEST
Computer Display)
(GUEST
Computer Display)
 (GUEST
Error Display)
(GUEST
Error Display)
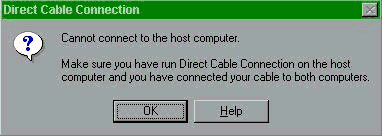
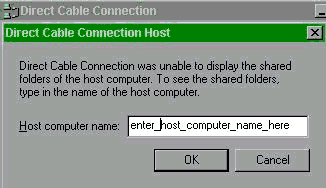
If you see the "Cannot connect to the host computer" box, there may be a problem with the cable you are using, or something is not configured correctly. Review the setup procedure on both computers and verify that you have indicated the correct ports in the guest/host setup. Check dial-in is enabled on the HOST. Other ideas are listed on the FAQ page for this document.
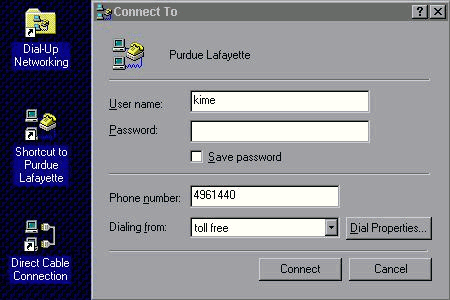
Enter the "Computer Name" you assigned for the Host computer.
If you did not correctly enter the Host computer's name, this warning will appear. Other protocol compatibility problems also can cause this dialogue box to appear. This is a common problem with DCC users and can be ignored by clicking OK.
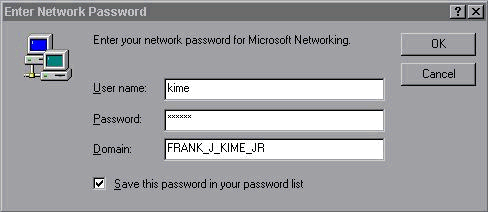
If the HOST computer is connected to a LAN using Microsoft Networking you can enter your account information here, otherwise click CANCEL.

You may disregard this message, it should not affect your ability to transfer files over DCC. Microsoft has updated the rasapi32.dll to correct problems related in this area.
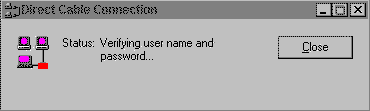
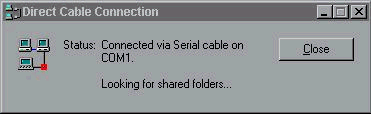
The two computers are attempting to resolve their names and shared folder lists. This should take less than one minute.
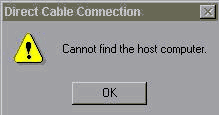
When the connection is ready, both computers should have a "Connected" dialogue box displayed. The GUEST computer will also have a button called "View Host." The view host display brings up windows in a manner similar to the "My Computer" function on your desktop. The View Host feature will not work correctly if the "Cannot Find Host Computer" error occurred, and you will have to use windows explorer to access the remote.
Trouble? Check the FAQ page!
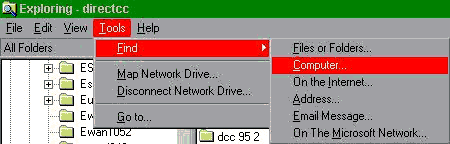
Using Windows Explorer to Access Remote Files and Mount Remote Drives
In Windows 95 Explorer click Tools/Find/Computer.

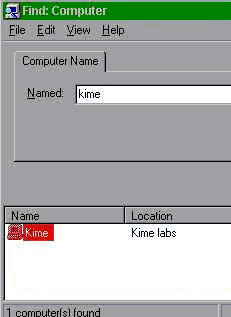
Enter the "Computer Name" you assigned for the Host computer. Click Find.
If the find function did not find the Host and you are sure the Host computer name is correct, check that you enabled the HOST sharing here and here. Also review this Microsoft KB Article #159578.
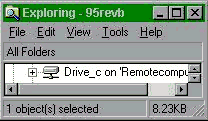
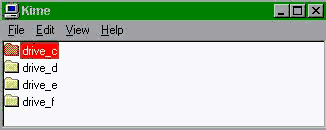
The remote drive is now mounted and ready for use. Files may be accessed
in explorer or other applications by referencing the drive letter assigned
above.
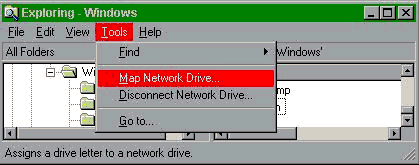
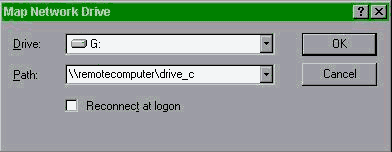
Shortcut #1
The network drive mounting procedure may be abbreviated by simply
launching windows explorer, TOOLS / Map Network Drive:
Enter the proper network address of the drive as follows:
\\ {computer name} \ {share
name}
Shortcut #2
Create a shortcut on the desktop for the network resource as follows:
After find computer and clicking on the little computer:
Drag the shared resource onto the desktop:
Whenever the remote computer is connected, the files can be accessed
by clicking on the shortcut. You must establish the DCC connection first
before clicking on the shortcut.
Once you have your connection going, it will become apparant things
would be better if DCC was just a bit faster. Some adjustments can be made
to increase your speed.
Not all parallel file transfer cables are the same. Some are slow
4 bit ones and others support EPP operation. Rather than cite the details
here, go to the source for parallel information contained at the Parallel
Technologies FAQ page.
Serial users can increase their transfer
rate to about 90K baud. Do not change the baud rate settings until the
link is working and you have transferred a few files to test it. Increased
baud rates can exceed a ports capabilities and prevent DCC from connecting.
A mismatch will also prevent connection. If you are ready, click START-Control
Panel and Double click the System icon.
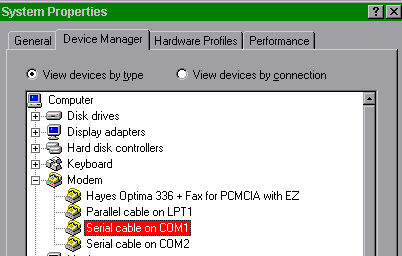
Click on the "Device Manager" tab and then Double Click the Modem
group.
Double click on the Serial port you are using to Direct Cable Connect.
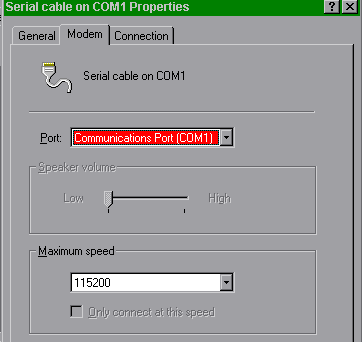
Set the baud rate to the maximum speed that both of the computers
will allow. PLEASE REMEMBER that you have changed the default baud rate
which is normally 19200 baud. You will not be able to connect to other
computers without changing their baud rate as well. BOTH COMPUTERS MUST
BE The SAME BAUD RATE.
Note #1: The baud rate setting will not take effect until
the computer is Restarted.
Related Sites
Connect ANY Windows Platform (Index to this Site)
Direct Connect Problem
Page ( Q&A Style Windows 95 Direct Connect Information )
Parallel Technologies FAQ (Get
a cable and excellent info here)
Connect Over
the Internet! (Windows95.COM Excellent Shareware and Tips)
Parallel Port Central (comprehensive parallel hardware info)
The Direct Connection
(Interesting Driver for Direct Connect RAS Modem)
Special thanks for contributions go to: Rick Whitham, Peter Blanshan,
George C. Lie, Peter Lawson, Bengt Sellman, Carol Troth, Mike Tovino, Brian
J. Bridson, Chris Wilson

If you could not find the answer here, or on the FAQ
page drop a line, Frank J. Kime Jr.
FAQ for this document (Hypertext)
LinkExchange
Member

 (GUEST
Computer Dialogue Box)
(GUEST
Computer Dialogue Box)