

![]()
|
|
|
| It is my firm conviction that you can obtain
better images from poor negatives, prints, and slides with your scanner
than the best photo darkroom! This is because the computer has tools that
darkroom people can only dream about. I should know, I used to be professional
studio photographer many years ago.
|
![]()
Before |
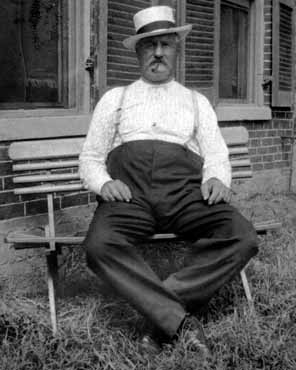
After |
![]()
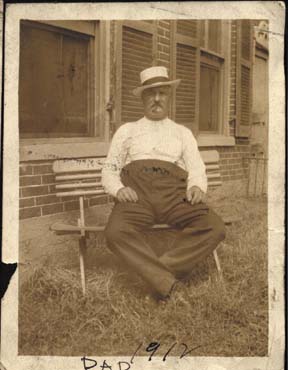
| Original
Notice how the original black-and-white photo has faded - a classic "sepia" look. This image is a good candidate for a desktop scanner since all the important data is in the midtones. Because this photo is going to be reprinted in a way that replicates its sepia-tone coloring, I will scale it at 100% of its original size before scanning. Scanning it at 300 spi will give me the resolution I need for output to a 150 lpi halftone screen at its original size. |
![]()
 |
 |
![]()
 |
Step 1
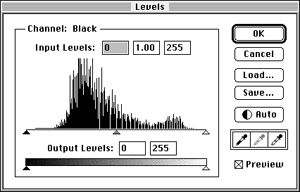
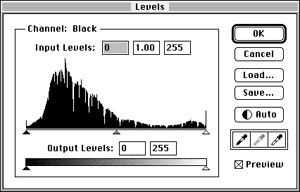
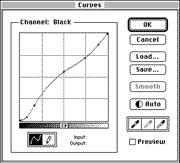
Preview the scan within your scanning software. Set the output levels to add depth to shadows and brighten highlights. Because Agfa's FotoLook drives my scanner, and it doesn't offer a histogram view to show the tonal range of the original, I chose to scan the original with no tone settings and then look within Photoshop at the histogram (using the Levels command) to see where the data lies. You can see how this faded image has a severely compressed tonal range. Step 2 I selected the Dmin/Dmax command on my scanning controls to expand the tonal range of the image. The histogram of the resulting scan shows the results. I also chose to crop in on the original image since the background contained many stains and smudges and added nothing to the picture. Step 3 After bringing the scanned image into Photoshop, I made further adjustments in the photo's tonal range by carefully adjusting the Curves control as shown. This adjustment added punch to the shadows and lightened the midtones without affecting the highlights. Step 4 The only way to clean up an image like this is to get your hands dirty! I used the Rubber Stamp tool to carefully eliminate unwanted scratches, dirt and stains. Use the Burn and Dodge tool as necessary for added emphasis. In this instance, the chair, suspenders, hat and eyes were selectively darkened and/or lightened. Note: Apple's PhotoFlash software offers automated tools to eliminate scratches and dust marks that make quick work of clean-up jobs such as this. See listing in reference. |
| Email: | comments@hsdesign.com |  |
|
| Design by: | Haywood & Sullivan | ||
| Copyright: | © 1996 Michael J. Sullivan | ||