

![]()
|
|
|
|
The human eye has a natural tendency to view
a scanned image as "soft" or out-of-focus. You'd think that a higher resolution
scan would help, but that's not the case. All scanned images need some
sharpening, even those scanned on high-end drum scanners. Master printers
and color separators will attest to this fact--they've been dealing with
this problem for years.
"Unsharp masking" is the trade term for a standard
technique that printers and color separators use to sharpen images by accentuating
the differences between adjoining areas of significantly different hue
or tone. The traditional technique uses a mask that's a slightly out-of-focus
duplicate of the original image. When the original is rescanned with this
mask, there is an increase in the degree of contrast at the boundaries
of tone shifts, however, subtle gradations in tone and hue remain untouched.
The result is increased sharpness where you would normally want it--in
the most highly detailed areas of the image.
There are three settings you can choose when you select Photoshop's Unsharp Mask filter: Radius Refers to the dimension, in width, of every sample that will be affected by the Unsharp Mask algorithm. I generally choose a setting between 1 and 1.5, depending on the resolution of the file and what I've designated for the Amount (below) and resolution of the file. The higher the resolution of the image, the greater the numerical setting for Radius. The formula to use is: Output resolution divided by 200. For example, designate a Radius of 1 for a 200 spi image. Designate a radius of 1.5 for a 300 spi image. The more Amount you use, the less Radius is necessary. Amount Refers to the intensity of the Unsharp Mask effect. A setting between 100% and 200% will do, depending on the Radius. The bigger the Radius, the less Amount needed. My "standard" Amount setting is 120% however, some images need more than this, and others less. Threshold Specifies how many numbers of samples in an image will be sharpened. A setting of 0 will affect every sample, whereas a setting of 50 will affect almost none of the samples. Highly detailed images such as line art, require a setting of 3, whereas portraits look best with a setting between 5 to 9. (We want to keep minor wrinkles down to a minimum, don't we?) It can take a while to come up with the right combination of settings for an image. That's why many manufacturers of scanning software now offer sharpening as an option during image capture. |
||||||||||||||||
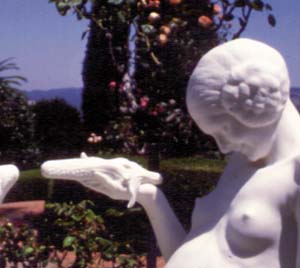
Amount=25 Radius=1 Threshold=5 |

Amount=120 Radius=1 Threshold=5 |

Amount=200 Radius=2 Threshold=20 |
| Email: | comments@hsdesign.com |  |
|
| Design by: | Haywood & Sullivan | ||
| Copyright: | © 1996 Michael J. Sullivan | ||
 You can apply
this same sharpening technique to your images with the Unsharp Mask filter
in Photoshop. Some other photoediting programs offer Unsharp Masking as
well. Here's how.
You can apply
this same sharpening technique to your images with the Unsharp Mask filter
in Photoshop. Some other photoediting programs offer Unsharp Masking as
well. Here's how.