
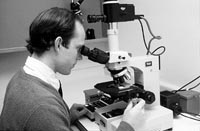
Greyscale Scanning
 Greyscale scanning is most often used for original photographs, but can
also be effective for maintaining the soft edge of some pencil sketches
that use lots of shading. Most flatbed desktop scanners are capable of
scanning 256 shades of grey. Some 30- and 36-bit scanners tout 4096 shades
of grey. While this may be true, you probably won't be able to use them.
The current PostScript specification only allows for 254 halftone steps
(the way a shade of grey is represented in print, 254 steps with pure white
and pure black which makes 256 total). The extra grey shades (bit depth)
may help to improve the scanners optical density (OD) range if implemented
properly. This can give you better shadow detail. Unfortunately most moderately
priced 30- and 36-bit desktop scanners implement the the expanded bit depth
only in color, opting for a more common lookup table (LUT) approach to
greyscale scanning.
Greyscale scanning is most often used for original photographs, but can
also be effective for maintaining the soft edge of some pencil sketches
that use lots of shading. Most flatbed desktop scanners are capable of
scanning 256 shades of grey. Some 30- and 36-bit scanners tout 4096 shades
of grey. While this may be true, you probably won't be able to use them.
The current PostScript specification only allows for 254 halftone steps
(the way a shade of grey is represented in print, 254 steps with pure white
and pure black which makes 256 total). The extra grey shades (bit depth)
may help to improve the scanners optical density (OD) range if implemented
properly. This can give you better shadow detail. Unfortunately most moderately
priced 30- and 36-bit desktop scanners implement the the expanded bit depth
only in color, opting for a more common lookup table (LUT) approach to
greyscale scanning.
Nevertheless, 256
shades of grey will probably be sufficient for just about all your needs
(unless you plan to scan Tomographs, or high-density negatives). Few desktop
printers can do justice to even 100 shades of grey. Even Ansel Adams landscapes
were judged good enough at 256 shades to be sold as screen savers.
Principles of Greyscale
Scanning
Most of us scan at too
high a resolution. As we increase scan resolution, we capture too much
detail--and the scan file can balloon to outrageous size. The PostScript
imagesetter, desktop laserprinter, or other device must render all of the
data, using lots of costly RIP time [ RIP - Raster Image Processor, the
specialized computer in your laserprinter or more expensive imagesetters
].
In addition,
as you work with a scanned image, the computer constantly has to re-crunch
the scan data. Over the course of a project this time really adds up. As
we count on computer's CPU to do more and more of the work for screen presentation
or ink jet printer output we can slow our system to a crawl by using too
much data.
Scans with too much
data not only rob your time, they can even crash the RIP or lock-up your
computer.
Take a few
moments to calculate what you need rather than scanning at a high DPI just
to be on the safe side. Capture just enough detail for what you need to
do.
Production Tips (Greyscale
Scanning)
Common Mistakes
-
Taking a big high resolution
scan and shrinking it to tiny size--16 Megabytes for a postage stamp--yow!
Reduce resolution by sampling down in a retouching program or better yet
re-scan at a lower resolution.
-
Cropping a little piece
of a big image in a page layout program--the RIP has to process that whole
big image, then throw away what's outside the cropping window. Crop
first in a retouching program, and bring what you need of the image into
the page at the proper size.
-
Thinking that white
borders dont count--white creates data too. Crop the borders away while
scanning to save the most time, or later in your image editing software.
-
Using a page layout
program to rotate big images. Most RIPs like image data straight. Twisting
all those pixels is risky, lengthy work. Rotate in a retouching program
or rescan in the right orientation.
-
Scanning Line Art as
a grey scale because it has fancy stippled shadow detail. Scan your artwork
at a higher Line Art resolution rather than grey scale. 2x3 inch 150 dpi
8-bit grey scale is 2 Meg worth of data compared to 600K for a 2x3 inch
400 dpi 1-bit Line Art scan.
Return
to the Main Page
Go
to the Next Section
Compiled and maintained
by Jeff Bone, © 1993-1997, All Rights Reserved
http://www.infomedia.net/scan/The-Scan-FAQ.html
/ 7.16.97 / jbone@jbone.com
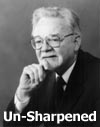
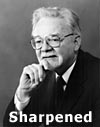 Sharpening the image in a retouching program gives a better looking result
than using a high scan resolution. Make the on-screen image just a little
sharper than you think is needed--it softens a bit in production. The CCD
chip in your scanner that actually reads the greyscale data is linearily
balanced, meaning that the transitions between grey areas tend to be minimized.
Sharpening algorithms in a retouching program like PhotoShop can adjust
for this. Always run your program's Sharpen routine on a scanned photo
to compensate for this.
Sharpening the image in a retouching program gives a better looking result
than using a high scan resolution. Make the on-screen image just a little
sharper than you think is needed--it softens a bit in production. The CCD
chip in your scanner that actually reads the greyscale data is linearily
balanced, meaning that the transitions between grey areas tend to be minimized.
Sharpening algorithms in a retouching program like PhotoShop can adjust
for this. Always run your program's Sharpen routine on a scanned photo
to compensate for this.